I’ve had a couple new little people who started recently and, as a result, I’ve been pulling out my tried and true fishing game quite a bit. I posted how a made mine very early on in my blogging career, which means it wasn’t seen by many, so please accept its re-posting and be sure to let us know if you have a variation others might like in comments!
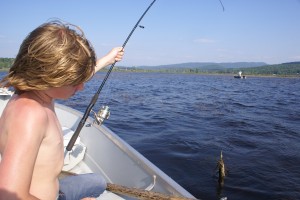
My family just returned from the beautiful mountains of NC. We spent a week hiking to waterfalls, swimming in the river and lots and lots of fishing! I know I’ll be reminded of this trip frequently during therapy, because all of “my” kiddos love to fish.
Fishing is a typical artic activity (see below for tips for a language transformation tips)—easy, engaging and universally beloved by young clients. Don’t have this yet? Follow the instructions below and start reeling them in!
Pole
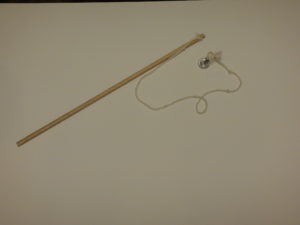
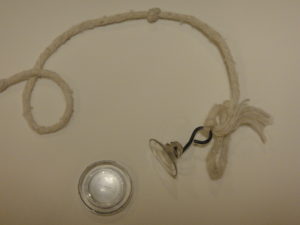
Materials: Dowel (18-20 inches); String (32-36 inches); small suction cup; round magnet
Drill a small hole ½ inch from one end of the dowel. Not good with a drill? Skip it.
Thread the string through the hole and tie to the rod. You will want approximately 30 inches of string hanging down. If you decided to skip drilling, simply tie the string tightly onto the end of the rod. Wrapping masking tape several layers thick around the end will help prevent it from slipping off or you can “cap” the end with clay.
Tie the dangling end to the small suction cup. Suction the cup to the magnet and, voila, your pole is ready!
Fish
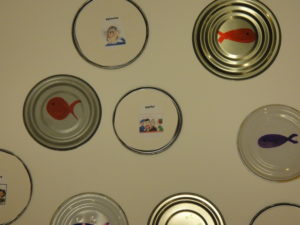
Materials: circular ends of metal cans (*I use an OXO can opener which gives smooth safe edges); Sharpie pens; poster board; glue or glue dots; artistic skill or clip art of your target words (nowadays I use Lesson Pix, though that isn’t the art in the photos)
Trace the cans on a piece of poster board. Cut slightly within this line and it should tuck perfectly inside the lid edge. A glue dot will make it more secure. Either paste the clip-art of your target or draw your own. Written prompts only are generally too advanced for the typical age of this activity. On the opposite side, draw a fish with a Sharpie. I usually have 8-10 fish/target sound. You’re all set!
How to Play: Scatter your lids, fish side up. The child can hook a fish easily with the magnet. To maximize the number of trials you can run through the words as you place them on the ground (in the “lake”). Then guess what they might hook.
Therapist: “Ooo I think you’ll get “lip”. What do you think it will be?”
Child: “Lip” (Child catches the fish and turns it over) “Lip!”
I allow kids to sit on the table (“dock”) when we fish which, I think, is one of the reasons they find it so appealing. It gives a whole new perspective to the room when you are sitting up high. You might also consider sitting on the end of the table (“boat”) and dividing your fish between the two sides. This allows you to add some trunk rotation/crossing mid-line to the activity.
Add a sensory component by having the child stand on a Bosu ball or mini trampoline “riverbank”. (A cheaper alternative might be a flat pillow or thick piece of foam)
And really there is no reason this has to be an articulation activity. Use vocabulary words and switch it to a language activity. You can even put a bucket(s) next to the child to add some prepositional or descriptive concepts.
Therapist: “ Ooo. You caught the rabbit. Put the rabbit in the bucket”; “Look! You caught the snake. Put him under the bucket”; “It’s a frog! Let’s put him in the small bucket”
Fish on!
Activity Tailor is now on Facebook–take a second to like us!




This Post Has 8 Comments
I love the “sitting on the dock” part! 🙂 Refreshing ideas for a tried-and-true activity! And don’t you LOVE Lesson Pix? Thanks for ALL of your great ideas!!
You are very welcome and Lesson Pix rocks :). Kim
I’ve never tried letting them sit on the dock, but I’m sure my kids would love it! I’m not nearly as creative as you, so I just use the magnetic fish-n-say from SuperDuper, but I mostly use them for language activities. I put pictures of verbs on my fish, and then I have sentences strips for “He is____”, “She is____” and “They are____”. My kids catch a fish, look at the picture and have to decide which sentence strip to put the fish on, then they say the sentence. This way my kiddos can work on pronouns, auxiliary verbs and present progressive tense! I’ve also used my fishing game to work on regular past tense verbs, I just work on one possible suffix at a time.
I’ve seen the Super Duper fish. They look fun; I just needed something more immediate and specific one day. Need=creativity! Love your language ideas. Thanks, Kim
GREAT ACTIVITY with plenty of options, especially for language! My mind is racing with ideas! Also, what about using wood cutouts of a fish (& starfish, crabs, etc) from a craft store and painting them with magnetic paint? Certainly not as cost effective as the can lids, and definitely more time consuming, but just another option.
That’s FABULOUS! I’m going to give that a try! Thanks, Kim
This is so cool! I know my kids would LOVE it!
Thanks! And I’m realizing now, while I like having bags of already made “fish” with specific targets, it would also be possible to put Velcro dots on the back and keeps bags of the target words with the reverse Velcro dot on them to swap quickly between students. Kim
Comments are closed.